
Registration How can I access my ePA?
Would you like to use your electronic patient file via the mhplus ePA app? We'll show you how. Explained very simply - step by step.
Step 1: Download the ePA app
Search for "mhplus ePA" in your app store or scan the QR code below.
Download the ePA app from the app store on your smartphone.
Your mobile phone version must be at least iOS 17 or Android 10. A display lock and PIN-entry must be enabled.
What you need:
- An eGK (electronic health card) with NFC function.
- a mobile device (smartphone or tablet) with NFC function. Secondary devices can also be added without the NFC function if necessary. NFC stands for "Near Field Communication" (wireless transmission technology). Tip: Open the settings of your device and search for "NFC " - if a menu item appears, the function is available.
- an enabled security feature on your mobile device (e.g., a screen lock or PIN request on startup).

Step 2: Register
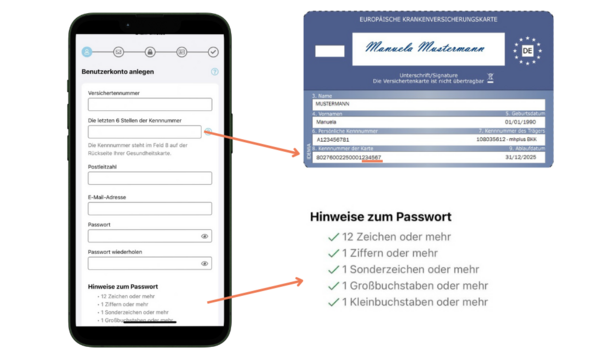
Open the mhplus ePA app. Create a user account. Click on "Register".
Enter your insurance number, the last 6 digits of your identification number and your postcode. You will find the identification number at the bottom left (field 8) on the back of your eHC.
Enter your e-mail address and choose a password. Make sure you also use special characters.
Accept the declaration of consent and the terms of use.
Click on "Continue" and confirm your e-mail address.
After registering, you will receive an e-mail with an activation link. The link is valid for 20 minutes.
Then go back to the app and enter your policyholder number and your previously chosen password. Finally, click on "Log in".
Step 3: Identify
For a secure login, assign an app code (a 6-digit PIN of your choice).
Optionally, you can also use Face ID or a fingerprint .
Click on "Next" and repeat the entry.
You have 4 different options to identify yourself:
1 ID card and PIN:
Start the process via the ePA app. You will be automatically redirected to the NECT app. There you can either enter the 6-digit PIN you have chosen yourself or the 5-digit transport PIN that you received with the PIN letter for your ID card. Then hold your ID card up to the NFC interface on your smartphone.
After successful identification, your data will be transferred automatically.
2 POSTIDENT on site:
After starting the POSTIDENT process, you will receive a confirmation email containing a process number and a corresponding link. Go to a post office branch to carry out the identification process and bring a valid ID document with you.
At the post office, your POSTIDENT QR code will be scanned and your ID document checked. Once the identification process has been successfully completed, your data will be transmitted automatically and securely.
3 Activation code (at a branch):
You can also identify yourself at your mhplus branch. To do this, bring an identification document and your electronic health card (eGK) with you. After successful identification, you will receive a printed copy of your activation code. Please note that the activation code is only valid for 14 days, after which you will receive the PIN for your health card by letter from your mhplus. This can take up to 2 weeks.
4 Health card (and corresponding PIN):
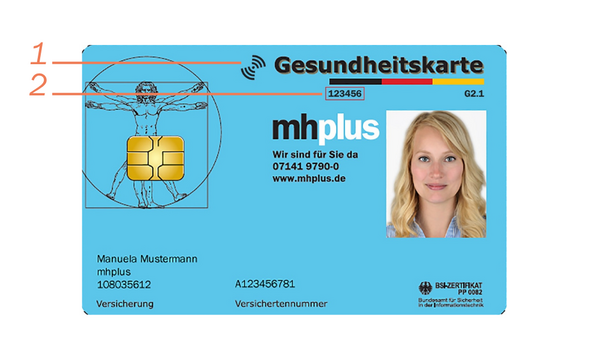
If you already have your eGK and the corresponding PIN, you can use it to log in directly to the ePA. In addition to the PIN number, you will also need the access number. This can be found on the front of your health card at the top centre (marked with a 2 in the picture). You also need an NFC-enabled health card. You can recognise this by the wifi indicator, which is also located on the front (marked 1 in the image). If you have not yet received the PIN, you cannot choose this option. Please use one of the other methods of identification.
You have now successfully identified yourself!
Step 4: Log in
Call up your electronic patient file by clicking on "Patient file".
Accept the terms of use of the ePA and click on "Continue".
When you set up access to the ePA, a health ID is automatically created for you. You can also use this to access the e-prescription.
Decide for yourself which applications you would like to be automatically registered for.
Select these and click on "Continue".
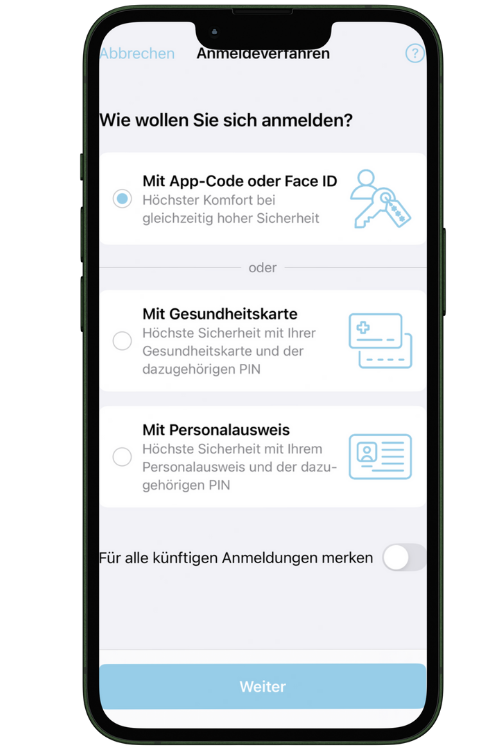
There are three ways in which you can register:
a. App code or Face ID (recommended):
Enter the app code that you have already set in step 3. You will receive a unique registration code by e-mail. Enter this and click on "Next".
Note: The code must be renewed every 6 months by re-identifying yourself and the device (device binding). This can be done using one of the following methods: eGK or eID + PIN.
b. With eGK and PIN:
Hold your NFC-enabled eGK up to the device and enter your PIN. You will receive this PIN by letter from your mhplus after successful identification (step 3).
c. With identity card (eID):
Hold your ID card (with online function) up to the device and enter the corresponding PIN.
Note: The PIN for the eID is not the same as for the eGK.
Good to know: If you log out of the ePA app, you will have to enter your policyholder number and password again the next time. This happens automatically if it has been more than 6 months since your last identification.
Mehrere Anwendungen. Ein Login.
Für die mhplus Service-App, die Online-Filiale und die ePA-App verwenden Sie dieselben Zugangsdaten.
Der verfügbare Zugang hängt von der Art der Identifizierung ab:
- Identifizierung mit Freischaltcode: Nutzung der Service-App und Online-Filiale. Dieser Flyer hilft Ihnen.
- Identifizierung mit sicherem Ident-Verfahren (z. B. Ausweis, PostIdent oder Gesundheitskarte): Nutzung der Service-App, Online-Filiale sowie ePA-App. Dieser Flyer hilft Ihnen.
Installation and start-up assistance ePA Desktop Client
- In addition to the app, a desktop version is also available to all insured persons.
- With the desktop client , you can conveniently use your electronic patient file on your computer - even if you don't want to use the app on your smartphone.
- The client offers you a simple way to manage your health documents securely and clearly.
- To use the ePA desktop client, insured persons need their health card (eGK) with eGK PIN and a card reader of security class 2 or 3.
- What is possible: Card reader with PIN keypad (security class 2 or 3) → higher security as the PIN is entered directly on the device.
- What is not possible: Card reader security class 1
Specific recommendations:
For Microsoft Windows 11 and higher
Recommended: Search for "ePA mhplus Desktop" in the Microsoft Store and click on "Install". After a short wait, you can open the application.
Alternatively: Download the installation file here . Select your mhplus health insurance company and the Windows operating system in the selection field.
- Download the file: The file is saved in the download folder.
- Installation: Double-click on the file and confirm with "Yes".
- Start: After installation, the app will appear in the start menu.
For MacOS
Recommended: Search for "ePA mhplus Desktop" in the Apple Store and click on "Install". After a short wait, you can open the application.
Alternatively: Download the installation file here . Select your mhplus health insurance company and theMacOS operating system in the selection field.
- Download: The file is saved in the download folder.
- Installation: Drag ePA.app into the "Applications" folder.
- First start: Open the app via the Launchpad. Confirm the first time by clicking on "Open" that it is an app downloaded from the Internet.
For Linux
Download the installation file here . Select your mhplus Krankenkasse and the Linux operating system in the selection field.
1 Open terminal; To use the application under Linux, please open a terminal (with Ctrl + Alt + T). Enter all the commands in these instructions there. The instructions apply to Debian/Ubuntu systems.
2 Card reader: The PCSC daemon must be installed for use with a card reader. Additional packages are required under Debian/Ubuntu.
3 Execution of the application: The application is available as an .AppImage file. To be able to start it, you must give it execution rights. To do this, use a command in the terminal: chmod +x *.AppImage .Note: From Ubuntu 23.04, you must also install the libfuse2 package for AppImage files to work. To do this, use the command sudo apt install libfuse2. To start, execute the file directly in the terminal with the following command: ./ePA-Desktop-FdV-linux-x.x.x-x.AppImage
Step-by-step guide to setting up the ePA client
-
Starting the application for the first time
When you open the application for the first time, the most important content and benefits of the app will be explained to you. Read this information and tap "Next" to continue. -
Connect a security class 2 or 3 card reader
Make sure that your card reader is already connected to the computer. You will be automatically prompted to insert or place your health card in the reader.
Tip: Leave the health card in the reader during the entire use to avoid interruptions. -
Enter your access number
The application will now ask for your access number. You will find this at the top of the front of your health card (see step 3 at the top of this page to find out exactly where this is). -
Log in
Click on "Log in". You will then be redirected to the login area. There you must accept the terms of use and privacy policy and click on "Continue". -
Enter PIN
Now you need the PIN for your health card. You will have received this from us by post. Enter the PIN and click on "Register".
If you no longer have the PIN or have lost it, you are welcome to contact us. -
Receive registration code
After registering, you will receive an e-mail with a registration code. This will be sent to the e-mail address you provided when you registered.
Important: If you no longer have access to this e-mail address, please contact us.
Congratulations!
You have now set up everything and can use the application.